In this article, I will explain some fundamental knowledge of using WordPress for a beginner. This will help you to get your site up fast so that you could start writing posts for your audience.
The content I will cover in this article is
- Logging in to the administrator dashboard
- Changing the theme of your site
- Difference between a page and a post
- Tying up the navigation with menus
Logging in to the administrator dashboard
To start working on your WordPress site, you need to log in to the admin dashboard. The default URL to log in to the admin dashboard is to append the string wp-admin to the end of your URL i.e. https://wordpressexamples.com/wp-admin/.

Enter your admin account and password to log in to the dashboard.

Changing the theme of your site
Although the default WordPress theme is fast, it looks plain and simple. The default theme is useful for native WordPress theme designers to create new child themes. However, for most WordPress users, you will probably want to start creating your site’s pages and posts. The easiest way to do this is to change your theme.
You can select a new theme from a wide list of popular themes in the WordPress library. Select Appearance > Themes . Then click on the **Add New** button.

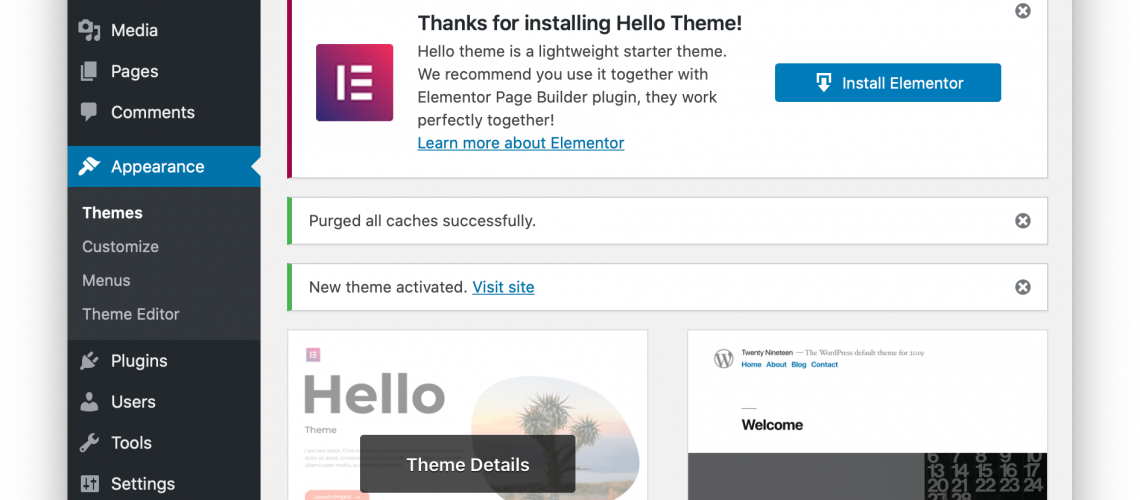
You can scroll and search for a theme of your preference. Once you have selected it, click Install and Activate.


In many themes, you may be asked to install additional plugins. Plugins are programs that you can install to add more functionalities to your site. Many theme designers use plugins when they were designing the themes. As such, you would also need to install those plugins for your theme to work as normal.
There is usually a button or a link that would appear right after you install your new theme. The button/link would help you to install every necessary plugin to make your theme work.


Depending on what plugins you installed, you may need to change the settings of them. You can access your plugins by clicking Plugins.

Lastly, access your site to see how it will look like with the new theme.

This new site may look plain and bored. However, with Elementor, it will be very easy and fast to get the whole site up using existing templates within the plugin.
After setting up the theme, you will want to start populating your site with contents. There are two main types of contents that you can create: Posts and Pages.
Difference between a Page and a Post
In a default set up, there are two content types that you can immediately create content with. You can create additional custom content types by coding or installing plugins. The two main types of content that you can create immediately are
- Posts
- Pages

There are technical differences between these two content types and they will be explained below. However, one simple rule that you can use to choose between these two content types is by asking yourself what is the purpose of the content.
Post content type
As a blogging platform, Post is the content type that you should choose when you are going to write a regular article. For example, if you are creating your site for the purpose of describing cooking recipes, then you should choose Post type when you are going to write a recipe article.

Beyond the purpose of the article, Post content type have Categories and Tags to help you to organise your content. Categories are used to broadly classify your content. For example, if your site is about cooking, you may have some contents written on recipes and others on the appliances used. You could then create two categories on recipes and appliances. You may then create tags for each category.

Another important characteristics of the Post content type is that they are dated and the posts are arranged in reverse chronological order. In this way, your site visitor will see the latest post on top, and the older posts could be found below or in other pages.

Last but not least, Post can be presented using WordPress’s Archives in a widget or the body.


Page content type
The Page content type is used when you want to create describe information that is not directly related to the purpose of your site. For example, you may want to create an About page and another page to list down the contact information.

Tying up the navigation with menus
Most websites have menus to help the visitors to navigate the site. You may set up multiple menus, but a theme usually supports a limited number of menu positions where you could place your menus.

You will need to create at least one primary menu. Select the locations that you want your menu to display on your site. You can change the locations later by going to the Menu Locations tab.


After setting the menu location, we could now add the contents to the menu.

After adding the contents and saving, you can now see your menu from your live site. Since WordPress is by default responsive, your menu changes its style depending on the browser size. Try altering your browser size and you probably would see the menu changes between the horizontal style and the mobile style.


The Next Steps
WordPress is easy to use. What I have covered in this article is the minimum that can get a beginner up to task to create a simple but presentable site.
However, WordPress is also highly flexible. There are many developers creating useful plugins that help us to achieve functions without writing a single line of code. There are many useful websites that will show you how to perform these tasks.
Before you leave this page, you may also want to read up on setting up an SMTP server to deliver your transactional emails from your WordPress site. Many beginners made this mistake, thinking that by installing a forms plugin would allow them to receive enquiries from the readers. However, without the right setup, these enquiries sent from the site may never reach your inbox. This post describes how you may set up SMTP servers on your self-hosted WordPress site to enable sending of transactional emails from your site.
You can subscribe to Quik Launch’s newsletter to get regular updates on tips to use WordPress more effectively.
In this article, I will explain some fundamental knowledge of using WordPress for a beginner. This will help you to get your site up fast so that you could start writing posts for your audience.
The content I will cover in this article is
- Logging in to the administrator dashboard
- Changing the theme of your site
- Difference between a page and a post
- Tying up the navigation with menus
Logging in to the administrator dashboard
To start working on your WordPress site, you need to log in to the admin dashboard. The default URL to log in to the admin dashboard is to append the string wp-admin to the end of your URL i.e. https://wordpressexamples.com/wp-admin/.
Enter your admin account and password to log in to the dashboard.
Changing the theme of your site
Although the default WordPress theme is fast, it looks plain and simple. The default theme is useful for native WordPress theme designers to create new child themes. However, for most WordPress users, you will probably want to start creating your site’s pages and posts. The easiest way to do this is to change your theme.
You can select a new theme from a wide list of popular themes in the WordPress library. Select Appearance > Themes . Then click on the **Add New** button.
You can scroll and search for a theme of your preference. Once you have selected it, click Install and Activate.
In many themes, you may be asked to install additional plugins. Plugins are programs that you can install to add more functionalities to your site. Many theme designers use plugins when they were designing the themes. As such, you would also need to install those plugins for your theme to work as normal.
There is usually a button or a link that would appear right after you install your new theme. The button/link would help you to install every necessary plugin to make your theme work.
Depending on what plugins you installed, you may need to change the settings of them. You can access your plugins by clicking Plugins.
Lastly, access your site to see how it will look like with the new theme.
This new site may look plain and bored. However, with Elementor, it will be very easy and fast to get the whole site up using existing templates within the plugin.
After setting up the theme, you will want to start populating your site with contents. There are two main types of contents that you can create: Posts and Pages.
Difference between a Page and a Post
In a default set up, there are two content types that you can immediately create content with. You can create additional custom content types by coding or installing plugins. The two main types of content that you can create immediately are
- Posts
- Pages
There are technical differences between these two content types and they will be explained below. However, one simple rule that you can use to choose between these two content types is by asking yourself what is the purpose of the content.
Post content type
As a blogging platform, Post is the content type that you should choose when you are going to write a regular article. For example, if you are creating your site for the purpose of describing cooking recipes, then you should choose Post type when you are going to write a recipe article.
Beyond the purpose of the article, Post content type have Categories and Tags to help you to organise your content. Categories are used to broadly classify your content. For example, if your site is about cooking, you may have some contents written on recipes and others on the appliances used. You could then create two categories on recipes and appliances. You may then create tags for each category.
Another important characteristics of the Post content type is that they are dated and the posts are arranged in reverse chronological order. In this way, your site visitor will see the latest post on top, and the older posts could be found below or in other pages.
Last but not least, Post can be presented using WordPress’s Archives in a widget or the body.
Page content type
The Page content type is used when you want to create describe information that is not directly related to the purpose of your site. For example, you may want to create an About page and another page to list down the contact information.
Tying up the navigation with menus
Most websites have menus to help the visitors to navigate the site. You may set up multiple menus, but a theme usually supports a limited number of menu positions where you could place your menus.
You will need to create at least one primary menu. Select the locations that you want your menu to display on your site. You can change the locations later by going to the Menu Locations tab.
After setting the menu location, we could now add the contents to the menu.
After adding the contents and saving, you can now see your menu from your live site. Since WordPress is by default responsive, your menu changes its style depending on the browser size. Try altering your browser size and you probably would see the menu changes between the horizontal style and the mobile style.
The Next Steps
WordPress is easy to use. What I have covered in this article is the minimum that can get a beginner up to task to create a simple but presentable site.
However, WordPress is also highly flexible. There are many developers creating useful plugins that help us to achieve functions without writing a single line of code. There are many useful websites that will show you how to perform these tasks.
Before you leave this page, you may also want to read up on setting up an SMTP server to deliver your transactional emails from your WordPress site. Many beginners made this mistake, thinking that by installing a forms plugin would allow them to receive enquiries from the readers. However, without the right setup, these enquiries sent from the site may never reach your inbox. This post describes how you may set up SMTP servers on your self-hosted WordPress site to enable sending of transactional emails from your site.
You can subscribe to Quik Launch’s newsletter to get regular updates on tips to use WordPress more effectively.
WordPress is a very popular content management system. In 2020, it is used in more than 30% of all the websites online. It’s popularity stem from its easy-to-use interface as well as its open source code base. As it is open source, site owners could install WordPress on their own hosts and have the assurance that they could transfer their sites to different hosts without losing their past contents.
In this article, I will explain some fundamental knowledge of using WordPress for a beginner. This will help you to get your site up fast so that you could start writing posts for your audience.
The content I will cover in this article is
- Logging in to the administrator dashboard
- Changing the theme of your site
- Difference between a page and a post
- Tying up the navigation with menus
Logging in to the administrator dashboard
To start working on your WordPress site, you need to log in to the admin dashboard. The default URL to log in to the admin dashboard is to append the string wp-admin to the end of your URL i.e. https://wordpressexamples.com/wp-admin/.
Enter your admin account and password to log in to the dashboard.
Changing the theme of your site
Although the default WordPress theme is fast, it looks plain and simple. The default theme is useful for native WordPress theme designers to create new child themes. However, for most WordPress users, you will probably want to start creating your site’s pages and posts. The easiest way to do this is to change your theme.
You can select a new theme from a wide list of popular themes in the WordPress library. Select Appearance > Themes . Then click on the **Add New** button.
You can scroll and search for a theme of your preference. Once you have selected it, click Install and Activate.
In many themes, you may be asked to install additional plugins. Plugins are programs that you can install to add more functionalities to your site. Many theme designers use plugins when they were designing the themes. As such, you would also need to install those plugins for your theme to work as normal.
There is usually a button or a link that would appear right after you install your new theme. The button/link would help you to install every necessary plugin to make your theme work.
Depending on what plugins you installed, you may need to change the settings of them. You can access your plugins by clicking Plugins.
Lastly, access your site to see how it will look like with the new theme.
This new site may look plain and bored. However, with Elementor, it will be very easy and fast to get the whole site up using existing templates within the plugin.
After setting up the theme, you will want to start populating your site with contents. There are two main types of contents that you can create: Posts and Pages.
Difference between a Page and a Post
In a default set up, there are two content types that you can immediately create content with. You can create additional custom content types by coding or installing plugins. The two main types of content that you can create immediately are
- Posts
- Pages
There are technical differences between these two content types and they will be explained below. However, one simple rule that you can use to choose between these two content types is by asking yourself what is the purpose of the content.
Post content type
As a blogging platform, Post is the content type that you should choose when you are going to write a regular article. For example, if you are creating your site for the purpose of describing cooking recipes, then you should choose Post type when you are going to write a recipe article.
Beyond the purpose of the article, Post content type have Categories and Tags to help you to organise your content. Categories are used to broadly classify your content. For example, if your site is about cooking, you may have some contents written on recipes and others on the appliances used. You could then create two categories on recipes and appliances. You may then create tags for each category.
Another important characteristics of the Post content type is that they are dated and the posts are arranged in reverse chronological order. In this way, your site visitor will see the latest post on top, and the older posts could be found below or in other pages.
Last but not least, Post can be presented using WordPress’s Archives in a widget or the body.
Page content type
The Page content type is used when you want to create describe information that is not directly related to the purpose of your site. For example, you may want to create an About page and another page to list down the contact information.
Tying up the navigation with menus
Most websites have menus to help the visitors to navigate the site. You may set up multiple menus, but a theme usually supports a limited number of menu positions where you could place your menus.
You will need to create at least one primary menu. Select the locations that you want your menu to display on your site. You can change the locations later by going to the Menu Locations tab.
After setting the menu location, we could now add the contents to the menu.
After adding the contents and saving, you can now see your menu from your live site. Since WordPress is by default responsive, your menu changes its style depending on the browser size. Try altering your browser size and you probably would see the menu changes between the horizontal style and the mobile style.
The Next Steps
WordPress is easy to use. What I have covered in this article is the minimum that can get a beginner up to task to create a simple but presentable site.
However, WordPress is also highly flexible. There are many developers creating useful plugins that help us to achieve functions without writing a single line of code. There are many useful websites that will show you how to perform these tasks.
Before you leave this page, you may also want to read up on setting up an SMTP server to deliver your transactional emails from your WordPress site. Many beginners made this mistake, thinking that by installing a forms plugin would allow them to receive enquiries from the readers. However, without the right setup, these enquiries sent from the site may never reach your inbox. This post describes how you may set up SMTP servers on your self-hosted WordPress site to enable sending of transactional emails from your site.
You can subscribe to Quik Launch’s newsletter to get regular updates on tips to use WordPress more effectively.